It happens to email marketers and gardeners …
Dormancy …
Hibernation …
Dark mornings that make pajama days insanely tempting …
Gardeners know plants are resting and getting ready for massive growth in the Spring.
And one of the ways they encourage healthy, productive trees and shrubs is by pruning.
In the garden, pruning leads to a fuller harvest and pest and disease control. Cut back the dead, dried out wood and branches that rub the wrong way, and you get more fruit, a healthier tree, and a lovely appearance.
Most of the time.
Two Pear trees and two apple trees were re-shaped last year with the help of online instructions and a printout from my mom, a master gardener. She was impressively gracious when she viewed our unusual interpretation.
While tree-pruning has its challenges, trimming your email list can be downright scary.
What if you drop the wrong people?
What if your following is less robust than you hoped.
The truth is …
If they aren’t reading your emails, you’ve already lost them.
Happily, reshaping your email list is easier than trimming a pear tree.
And if you want to increase your open rates, engage your readers, and protect your online reputation, you need to do this …
So if you’ve waffled or put off this inevitable chore, move ahead with me – let’s do some virtual lopping together.
Why Prune Your Email List?
Over time, email subscribers naturally drop off. Your newsletters and house sale tips are no longer useful to the couple that finally sold their home. Or your reader enjoyed your branding download but found she needed to outsource the graphic design. People move on. It’s not your fault.
Get Response estimates a natural churn rate of between 25 and 30 percent per year. That includes but is not limited to people who have lost interest. After all, not everyone who stops reading has unsubscribed. Your messages might be stuck in spam or secondary accounts your people reserve for freebie downloads.
Regardless of the reasons for lack of engagement, releasing inactive subscribers helps you get a clear picture of your email situation while protecting your email sender reputation.
- Pruning reduces your chances of being labeled as spam or suffering from abuse complaints – and that reduces you chance of being penalized or shut down by your email provider
- A smaller list means you get lower monthly email provider costs, since email services generally charge by the number of subscribers – you only pay for the people who engage
- You can enjoy watching your email Open and Click Rates instantly improve
- Reduces bounces – while soft bounces may indicate a temporary problem in deliverability, hard bounces mean you have bad emails – get too many, and you look like a spammer
- Better ROI for your email campaigns
How to Prune Your Email List in ConvertKit:
Pruning in ConvertKit only takes a few minutes. Follow the steps below, and you’ll have an automated process giving them the option to stay.
1 – Go to your subscriber tab in the top menu bar email and click to show subscribers.
2 – Click the SUBSCRIBERS header at the top of the page to access the pull-down menu and select cold subscribers.
This is where ConvertKit does the work for you. They define cold as not clicking or opening in the last 90 days. For subscribers who have recently joined, 90 days, they count anyone who has been active for at least 30 days and not opened or clicked an email.
3- Create a tag in the right-hand sidebar menu (name it “cold” … “frosty” … “chillin” … whatever you like)
4- Click the small SUBSCRIBER box at the top of the cold subscribers list to select all subscribers on the page


5 – When text pops up next to the box saying “All [30] subscribers on this page are selected. Select all [79] cold subscribers,” click the text so select all your cold subscribers if there are multiple pages.
6 – Click Bulk Actions in the top right menu and choose Tag. Then choose your new “cold” tag.
7 – Head to automations (top blue menu bar) and select rules in the upper right corner of the page.
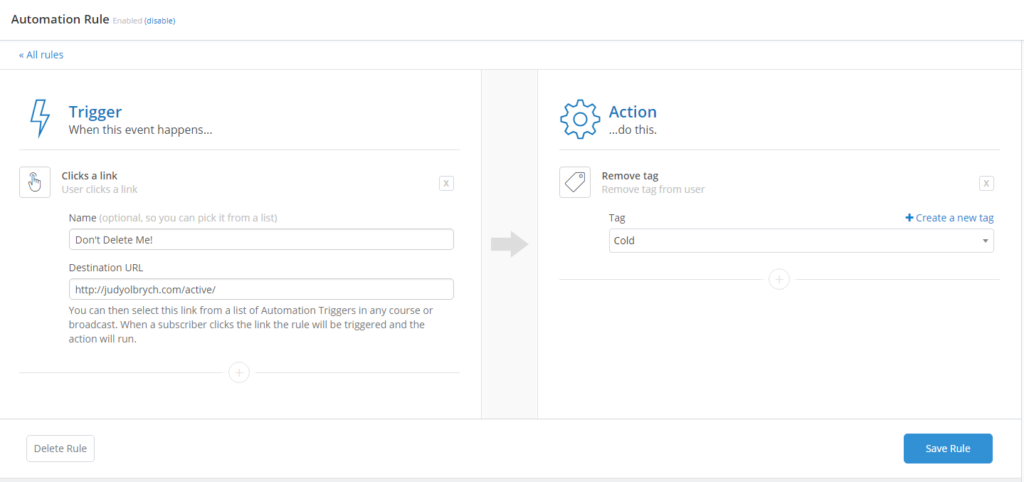

8 – Choose RULES and Click the Add Rule button.
9 – For trigger choose Clicks a link. Call the rule whatever you like. Create a landing page or webpage for the destination UR where you can let them know you’re still on the list.
10 – For Action, choose Remove tag. Select the “cold” tag and save the rule
11 – Now write an email broadcast to your cold subscribers letting them know you will remove them after 10 days if you don’t hear from them. Give them the link to your page and tell them to Click it if they want to keep hearing from you.
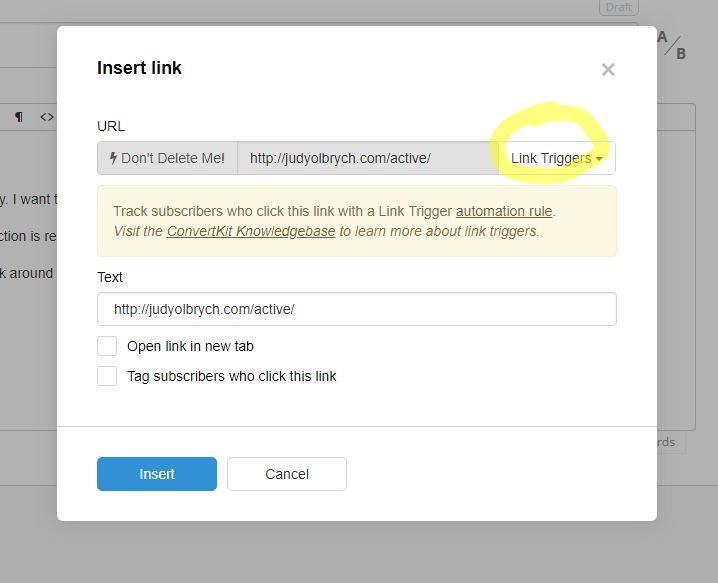
IMPORTANT: When you create the link, click the link triggers pull-down menu on the create link pop-up and choose the link trigger you created in your menu (also there on the edit link pop-up in case you missed this step when writing the first email).

12 – Send your email. After 7-10 days, drop the cold subscribers who have not clicked the link. These should be the only ones left, assuming you’ve activated your link trigger
Reach Out to Your Cold Subscribers Before You Say Goodbye …
Want to reach out to your cold subscribers before you give them notice? Encourage them to stick around with a re-engagement campaign.
- Show them what they’ve missed
- offer them a special discount
- ask them to choose the frequency of their mailings
- or narrow their emails to include only those around a specific topic
Every email provider has best practices for pruning. I enjoy ConvertKit, because it’s user-friendly and saves me time on ROI-related tasks. To experience ConvertKit’s user-friendly platform for yourself, click the button below for your Free Two-Week Trial: